Initial Setup Wizard

When you first receive your system and login for the first time, you are brought to the intial setup wizard.

It takes you through picking the sectors in both the Security industry or the Investigation industry your business works in.

Then runs through the setup of the options with simple questions that help you to quickly pre-setup the system, ready for you to fine tune it suit your business needs.

Can’t get the settings quite right ? Get intouch and we will happily set the system up for you.

Company Details

You input your company details and this information is used to pre populate all invoices, documents and agreements throughout the system.

Company Name – The company name is displayed on all documents and is used for the page title on every page. 

Company Address – Address is displayed in the header on all of your agreements, documents and exported files that the system generates.

Localisation – Choose between UK, New Zealand or Canada (More Localisation coming in future releases). The Localisation changes the one click licence checkers, to point to the licencing bodies in your country. e.g. If you click to auto check the security licence in the UK, you are taken to the UK S.I.A (Security Industry Authority) website, but if your Localisation is New Zealand, you are taken to the NZ P.S.P.L.A (Private Security Personnel Licensing Authority) website to check the employee licence number.

Social Media

The social media section allows you to add your company Facebook, Twitter, Linked In & Instagram.  

Social Media Icons are displayed at the bottom of the Client Portal that link through to your social media to provide easy access for your Clients, the Social Media Icon links are also provided in the client correspondence email footers.

If you dont have any of the Social Media links, simply leave them blank and the system will not display the link in the client portal.

Look & Feel

Ability to change the system to suit your Business look.

Login Sounds – Audio feedback when the administrator has logged in.

Colour Scheme – Choose from Sky, Gold, Green, Grey, Rose, Maroon, Navy, Orange, Purple or Red. If the colour scheme doesnt fit your business needs, simply ask and we will create a custom colour scheme to fit your needs.

Company Logo – Uploading your company logo will change all Logos throughout the system to suit your business branding.

Company Icon – Adding your company icon, replaces the default vireo icon including replacing the favicon on the cloud version pages, its also used for the collapsed menu on the Mobile App.

Profile View – If you wish to have the sections on the Employee and Client profiles in a vertical or tabulated layout format. 

Company Signature – Used for the [COMPANY-SIGNATURE] shortcode to place your managers signature in your agreements.

Open Graph

The Open Graph protocol enables any web page to become a rich object on a social website.

Basically it is used to style your Social Media advertising, the title, description and image you upload will be displayed when your Login and registration pages are shared on social media.

  • og:title – The title of your object as it should appear within the graph, e.g., “Vireo Software – Online System”.
  • og:description – A one to two sentence description of your system.
  • og:image – An image which must be 1200 width by 1200 height and should be uploaded to represent your object within the graph.
  • og:url – The canonical URL is set automatically by the system.
If you need any help setting this up, or do not understand it, simply contact us, we are happy to help.

Financial

Setup the financial settings for your company.

Currency – choose from £ (Pounds), $ (Dollars) or € (Euros) for your system currency. This allows the system to be used in the UK, Canada, USA, New Zealand, Australia & Europe.

VAT Registered – If your company is VAT registered, if you set this, your company invoices to your clients will have VAT added at the rate you set below automatically.

VAT Rate – Based on your country, you may set the VAT rate to your country in a percentage. This percentage is automatically added to the invoices for Clients if your company is set as VAT registered. This rate is stored on a per invoice basis, incase your country VAT rate changes in the future. So your invoice VAT history is always precise to the time of invoicing, keeping your financial records exact.

Auto Invoice Referencing – You have the ability to add Shortcodes for the system to automatically generate your invoice numbers for you.

Auto Job Referencing – As above, you have the ability to add Shortcodes for the system to automatically generate your Job numbers for you.


You may use the shortcodes for Invoice Reference and Task Reference Generation:

This incrementally counts the number in the system e.g. if Client A has the 1st and 3rd invoice and Client B has the 2nd. Client A will have invoice one and three and Client B will have invoice two.

This incrementally counts the current number that the client has e.g. if a Client has 5 invoices, each invoice will be numbered 1 through to 5, not taking into account how many invoices are in the system.

This will add the systems automatically generated Client ID number.

This will add the first 3 characters of the Clients name.

This will add the first 4 characters of the Clients name.

This will add the first 5 characters of the Clients name.

This will add the current year at the time of adding.


Invoice Directions – This gives you the ability to write a thank you message, company bank details, or check details or anything required to give to the Client as part of the invoice. This text is added to the bottom of all non-discreet invoices.

Payment Settings

Payment Terms  – You may set the payment terms for your Commercial & Private clients, for instance if you wish for your Private clients to pay upfront when they accept a quotation, you can select upfront payment. 

“Upfront Payment” would mean the client must pay the amount in full, before the quotation can be accepted. When the amount is paid, the invoice is automatically generated and marked as paid. 

Lets say you wanted your Commercial clients to pay their invoice in a month time, you could select “1 Month Due Date”. When the Commercial client accepts the quotation, the invoice would be generated with the due date set for a months time. The client could proceed with the acceptance of the Job on an invoicing basis.

Invoice Settings – We noticed when developing the system, that certain companies had different invoicing strategies. For example one company in the private investigation industry did not want their Commercial clients to have the ability to view and pay the invoice, before it was due. They wanted their Private clients to have the ability to pay in advance. So we added the invoice settings section which allows you to choose if you want the ability for your clients to be able to view and pay the invoice before the due date. 

Payment Gateway – You can choose your default PaymentGateway settings for either Paypal, Stripe or Worldpay.

Checkout Type – Choose from the Checkout types Enquiry and Quotation or an E-commerce Shopping Cart Based system.

Payment Gateway Settings

Choose from Stripe, PayPal or World Pay as your payment gateway provider to accept Credit, Debit cards or PayPal from your customers.

PayPal – Simply provide your Paypal email address and the system takes care of the rest.

Stripe – Once you signup for a Stripe account, retreive your Publishable and Secret key to link your account, the system then takes care of the rest.

World Pay – When you setup an account with world pay, you can ask your account manager for your integration settings.

SMS Gateway Settings

Choose between PAYG Text Anywhere or our subscription SMS service. You must have an account with Text Anywhere to use the PAYG SMS service.

If you are using the SMS gateway, enter your Text Anywhere details from your Control Panel:

SMS Originator: The “From” name that will be shown on the Mobile device when the SMS is received.

ClientID: The id number provided in your Text Anywhere control panel.

Client Password: Your password that is provided in your Text Anywhere control panel.

Facebook Page Manager

Using the Facebook Page Manager, you can setup which pages you would like to post to from the Job Advertising section. You can advertise to an Unlimited number of pages at the same time. We have worked with the Facebook Developer API to make setting up your pages easy.

Step 1: Click the “Setup Pages” button on the Facebook Page Manager in the settings page, a browser window with Facebook will appear asking you to login to your account.

Step 2: Login to your Facebook account.

Step 3: You are presented with a box that asks you “What pages you want to use with Vireo Page Manager ?”, select the pages you want to use with Vireo for Advertising Jobs.

Step 4: Grant the Vireo Page Manager permission to post to the page on your behalf.

Finish: You have now setup your Vireo Page Manager to post to your Facebook pages. When you advertise a job, the pages you have selected here, would become available to be automatically posted to on your company’s behalf.

Twitter API Access

To use the Twitter API, you must sign up for a free Twitter Developer account.

Step 1: Click get keys which will take you through to the twitter developer website to sign up for an account. You must login with the twitter account you want to post to.

Step 2: You must choose either a individual or team account and complete the short data protection survey that Twitter requires.

Step 3: Create an App, call it your company name and add an identifier such as “Vireo Software” if you have more than one app.

Step 4: Generate your API Keys and Access Tokens.

Finish: Copy your Keys and Tokens into the settings page and your Automatic Twitter advertising is setup and ready to go. The option to advertise to your twitter page will now appear in the Job Advertising section.

Email Settings

Whenever you send an internal email within the system or a notification is sent out from the software, it is sent as a standard email to the users email address that is on file.

To ensure that the emails come and go from the correct locations, you can change the way it is setup from within the Email Settings.

From Email: When the email is sent out via the system what email address do you want to send it from ?

From Name: What name should appear in the inbox of the user when they are emailed ? This is normally your company name.

Reply-To Email: When the user decides to reply directly to the email and clicks the reply button, which email address do you want the reply email to come to.

Reply-To Name: When they reply, what name would you like it to be addressed to ?

These settings are useful so you can send the emails from a no reply system email e.g. system@yourdomain.com and when they reply you could force the response to an actual person within your company e.g. the.manager@yourdomain.com this means they will recieve an email from a blank email account but responses are funnelled to a valid employee email within your company address book.

Two Factor Authentication

Two Factor Authentication is an extra layer of security that requires not just a password and username but also something that the user has on them such a mobile phone or usb stick. It is normally something you remember as factor one and something you have as a possession as factor two.

Below is the levels of 2FA options available within the system, the higher the level the more account protection that is provided.

Two-Factor Options

WARNING: None – Single Factor Authentication Selected.

LEVEL 1: E-Mail – One time Access code is sent to your email account, you must have your password and access to your email account.

LEVEL 2: SMS – One time Access code is sent to your mobile phone via SMS, you must have your password and your mobile phone to hand.

LEVEL 3: Google Authenticator – During 2FA setup, the system generates an encrypted code, you scan a barcode into the Google Authenticator app on your device, the app can then generate a one time access code for you to login, if it matches the server, you are authorised access.

LEVEL 4: FIDO U2F – the same as Google Authenticator except you must have a Fido u2f security key that generates your one time access code instead.

LEVEL 5: NFC Smart Card – You must have a NFC reader, plus an NFC smart card with a 512bit encrypted key from us that is tied to your account. This means you would require your password and then a smart card to swipe over the NFC terminal to gain access to your account.

LEVEL 6: Windows BioMetrics – Only available on the windows desktop version. It uses Windows Hello biometrics for you to gain access to your account. please note setting the option to this will lock you out of the cloud version and require you to login on the windows desktop version of the software.

Device Memory

When you login with Two Factor authentication, you have the option for the system to remember your device to stop you from having to authenticate every time. Changing the device memory allows you to change the expiry date to suit your needs.

If you think there may have been a security breach, you can wipe the device memory from your profile page at any time, forcing every device to Two Factor authenticate when they try to login next time.

Google API Access

Vireo allows the use of Google API’s to prevent automatic signups from bots and show maps in the system.

Google reCAPTCHA: is a free security service that protects your system from spam and abuse. It basically runs a check with Google to ensure the person registering for an account is not a Bot.

Google Maps: Is the mapping technology we use in the Vireo system for Geocoding addresses and pinpointing your Employees on the map. Google maps for fair usage is free, you simply need an API key.

We can help with the setup of any API accounts you may need with the system.

Data Protection Officer

The GDPR introduces a duty for you to appoint a data protection officer (DPO). DPOs assist you to monitor internal compliance, inform and advise on your data protection obligations, provide advice regarding Data Protection Impact Assessments (DPIAs) and act as a contact point for data subjects and the supervisory authority.

The system allows you to appoint a Data Protection Officer, they will be sent all data subject access requests that are filed from the Employee and Client portals, addressed to the name of the “Data Protection Officer

Client Settings

The Client Settings lets you set options that effect the workings of the client portal.

Registration Page – Switch the Clients ability to register for an account with your company on or off. If you switch the registration off but want the client to login, you would have to manually create a client account from the administration area and provide the client with the login credentials.

Forced Password Strength – You can set the minimum password strength required for registration. 

Login Page – You have the ability to disable the Client Portal altogether, if you disable the login, the client area will no longer be accessible. You can then only manage your clients internally within the system without the clients input.

Internal Mailbox – Allows you to turn off the Confidential Internal Messaging system for the client portal if you wish, forcing the client to communicate via telephone or unsecure external email.

Number of Enquiry Sectors – When a Client makes an enquiry, this allows you to restrict the number of sectors they can pick for an Enquiry. e.g. if you restrict to one per enquiry, this will limit the Client to only make one enquiry for one sector. Multiple sectors are useful if one job requires e.g. CP, Chauffeur & Event Security as part of the same job.

Forced Due Dilligence – This will force the Client to upload their Verification, otherwise they can not proceed and complete the registration process without uploading their files.

Help Link – This link is displayed in the Client personal menu,  you can provide a link for them to get help from your company. Either a guide to using the System an link to a Contact Form or an Email Address. To add a email address as a link precede the email address with mailto: 
e.g. ‘mailto:email@yourcompany.com’


Discreet Mode

Turning Discreet Mode on in the settings allows you or your clients to then switch their account to a Discreet account. A Discreet Account replaces your company name and logo in the email and SMS correspondence for a fake or less conspicuous company details. Useful for Private Investigation Clients. Some private investigation companies have their own discreet companies registered for this very reason. From the settings page you can set the default options for Discreet Mode.

Discreet Logo – You can replace your standard company logo with a more discreet logo. Leave blank for the standard empty logo.

Discreet Company Name – Replace your standard company name with a more discreet name.

Discrete Company Address – If you have an alternative discreet address, enter it here or leave it blank to not display an address on the discreet invoices and reports.

Discrete Payment Directions – If you have a discreet bank account, these details can be put here to be added to the discreet invoices.

Discrete Mobile Correspondence – You can set the default mobile correspondence which is sent to the user in the “From” field of SMS messages. The client can override this field from their profile.

Where this is useful is for instance you are Investigating a company’s accounts department where you wish to receive ongoing payments, but the payments must pass through the person being investigated. A wife that is Investigating an abusive partner, does not want to receive text messages or emails that have a name and address from an Investigation company.

Employee Settings

Modifying the Employee Settings gives you the options to modify the Employee portal to suit your company needs. 

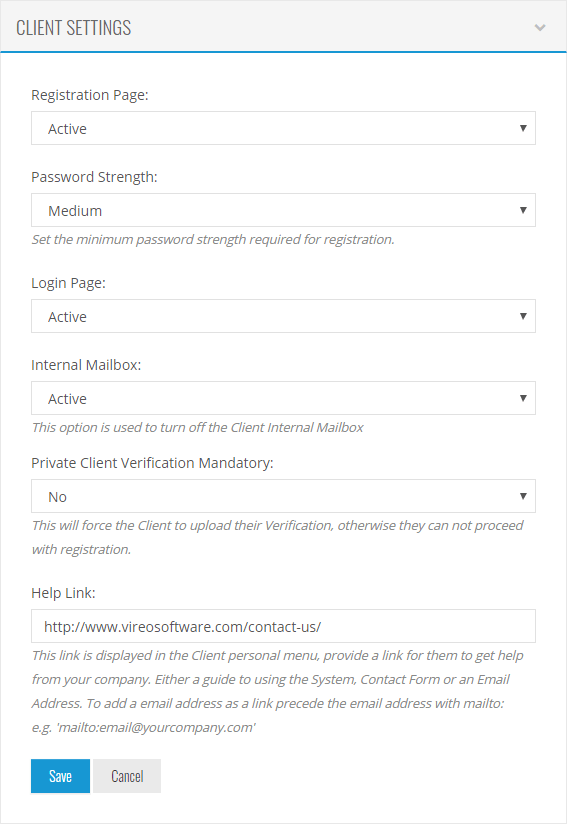
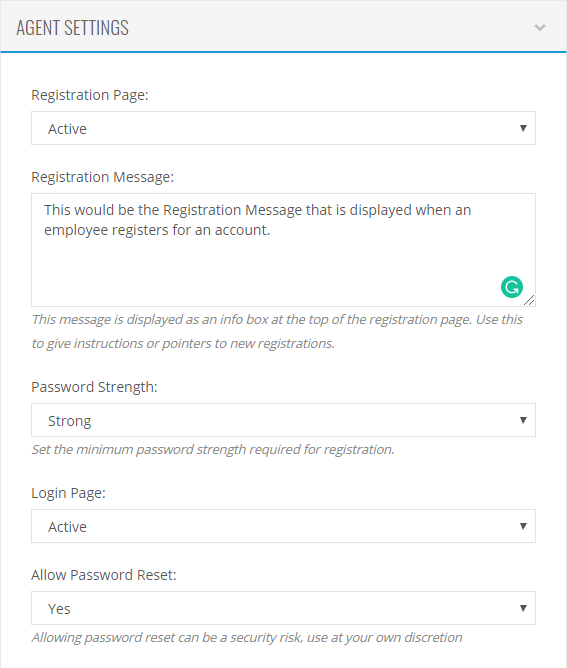
Registration Page: Switch the Employee’s ability to register for an account with your company on or off. If you switch the registration off but want the employee to login, you would have to manually create a employee account from the administration area and then provide the employee with the login credentials.

Registration Message: This message is displayed as an info box at the top of the registration page. Use this to give instructions or pointers to new employee registrations.

Password Strength: Set the minimum password strength required for Employee registration.

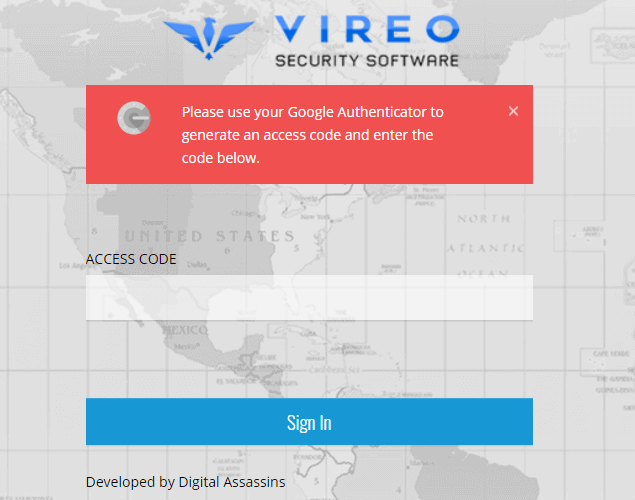
Login Page: You have the ability to completely turn off the Employee portal.

Allow Password Reset: Enable the password reset link on the login page, it allows the Employee to reset their own password. Allowing password reset can be a security risk, use at your own discretion.

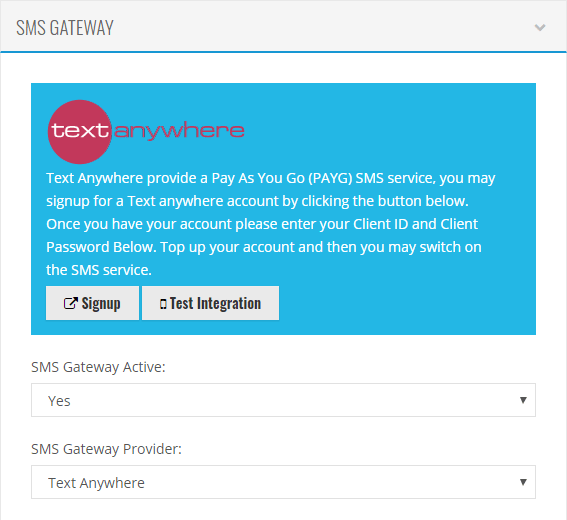
Password Reset Method: Select between sending an email to verify password reset or an SMS, sending an SMS is more secure.

Internal Mailbox: This option is used to turn off the Employee Confidential Internal Mailbox system.

Jobs Board: A page used to display currently available job positions, this is accessed via the Employee Portal.

Sector Lockdown: Locking down the sectors, only allows Employees who have selected the specific sector to view that type of job on the jobs board. Unlock the sector lockdown for Employees to view all available jobs from any sector. 

Help Link: This link is displayed in the Employee personal menu, provide a link for them to get help from your company. Either a guide to using the System, Contact Form or an Email Address. To add a email address as a link you can precede the email address with mailto: 
e.g. ‘mailto:email@yourcompany.com’

Driving Licence Declaration Settings

Choose the monthly recurrence and day of the month to force the resigning of each Driving Licence Declaration for your Employees. You would then need to activate the driving licence declaration for each Employee you require to sign a declaration, from within the employee’s profile area.

Recurrence: You can choose a the length of time between each Driving Licence Declaration re-sign.

Day of the Month: You may choose the day of the month to request the resigning of each Driving Licence Declaration for the Agents.

Invoice Settings

Invoice Due Date Lockdown: Locking down the Invoice Due Date, automatically sets the due date on the Employees Invoice to a set period after the upload. Setting the Lockdown to No will allow the Employees to specify their own Due date.

Invoice Due Date Period: If lockdown is set to yes, you can then specify the date after the invoice upload, that you wish the invoice to be due. e.g. If you set the invoice lockdown to yes and chosen “one month due invoice”, when the Employee uploads their invoice, the due date will automatically be set to one month after the upload date.

App Settings

The Mobile app settings allows you to setup how you want to use the Mobile Apps with your system:

Apps Only: When the employee visits the mobile cloud portal login page, the login screen is replaced with a mobile apps download page, which provides them with the link to the Mobile Apps on iPhone, Android and Windows. This funnels them to use the mobile apps instead of the Mobile cloud portal. This does not effect using the portal on Desktop.

Mobile Web Portal & Apps: When you select both Mobile Web Portal and Mobile Apps, the login page on mobile has links to download the apps from the appstores while still allowing the user to login to the Web Portal, so the user has the choice of the two options.

Apps Disabled: Turning off the Mobile Apps will stop a user from logging into the Mobile Apps on their phones and they will only be able to login to the mobile web portal via a web browser.

App Type: You have the choice between the Vireo App or your own Company Branded app. If you have purchased your own Brand apps, the option opens to provide your links for the app stores. Simply copy the links we have provided for your own branded apps into the appstore boxes provided.

Menu Editor

The Menu editor gives you the ability to turn off any part of the system that you dont want ot use.

For instance, if your company does not have a Canine Security Handler team, you can simply just untick the box next to the “K9 Unit” section to completely turn it off in the system.

You can build the system to your own company needs, turn off what you will never use and keep turned on all the tools you will use, make the system bespoke for your business.

User Management

User management area lets you add and delete Administrator and Management users.

Only Super Admin (Management) have the ability to Add, Edit and Delete System Users.

The Ultimate Management software for the Security & Investigation Industries.