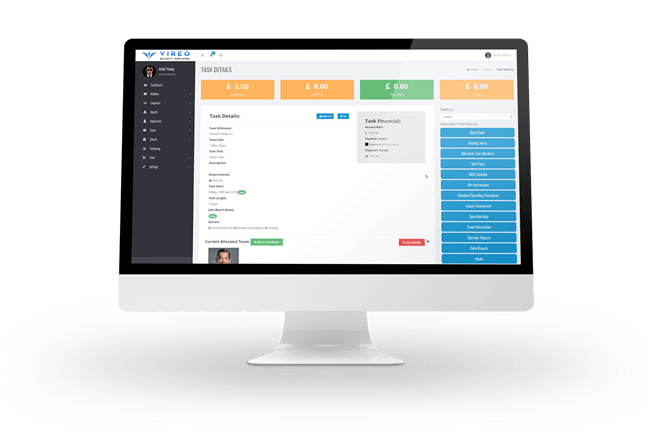
Job Overview

The “Job Overview” area gives you a quick at a glance overview of all the job details, financials, team & progress status, aswell as the ability to fully manage any job in the Private Investigation or Security Industries.

Based on the Sector of the Industries the job is apart of, the menus all morph to suit the job in question. For example, if the job was down as an Residential Security Team job, all the menu items for surveillance and private investigation disappear and you are presented with the tools to manage a RST job.

Job Advertisement

By clicking the “Advertise” button from within the Applicants section, takes you to the Job Advertisement page where you can send out a one click Advertisement to your employees by Distance from Location. This can be sent via SMS, Email or Push Notification. 

Instantly Post your Advertisement to Twitter and Facebook at the same time.

Also have the option to choose if you want to publish to the Jobs board on the Employee Portal. 

For more information checkout the Job Advertisement page. [LINKTOSECTION]

Job Applications

When you have sent out the advertisements to your employees, they will receive either a SMS or Email with a Link, clicking this link, allows them to apply for the position. You can fill positions in minutes with realtime advert responses from employees. 

If you have chosen to advertise on the jobs board, the employees can also sign in and apply for the position via the jobs board inside the Employee Portal. [LINKTOSECTION]

Shortlisting

The Shortlisting System allows you to put together a shortlist of Candidates manually. You can then export the Shortlisted Candidates Biographies to a single PDF file. This can be useful in the Security industry for Close Protection. You may have a demanding client that wants to view a shortlist of Employees who will be protecting them, so they can choose their own Close Protection officers.

If you wanted to export a single Employee profile to a CV PDF, you could alternatively use the “Print CV” button from within the Employee Profile. [LINKTOSECTION]

Team Management

You can manage your Team seamlessly with our Team Management feature. Once you have shortlisted a candidate, you have the ability to add them to the Successful team. Once the employee is on the Successful team they are notified that they have been successful and are currently on standby. They are restricted from accessing live job information but they become eligible to receive and view Shifts for the job.

Once they are switched onto the “Allocated Team” this allows the Employee to view all the job data, which is restricted based on the Job status. If it is pending the data they can view is limited. If the Job is active all job information and options become available.

The Team management system will Automatically switch employee Data Access Restrictions based on Job Status, Team Allocation and Job Progress. It takes away the need to think about who has access to what data and when. It works by the security principle of least privilege. The Employees should only have access to exactly what they need at the time and nothing more. Once they no longer need access to the data, access is instantly removed.

Shift Management

Once your team are added to the sucessful team, you have the ability to add shifts to the Employees Shift Rota and Calendars. Once you add a shift, the employee is instanly notified by email that a new shift has been added to their shift rota, they are advised to login to check their latest shifts.

Once they login and view the shift rota, the administrators are notified via a realtime notification that they have viewed their shifts and the action is then logged.

If you make a mistake or some of your employees switch shifts, you can easily edit and delete shifts and even move them from one employee to the next, making shift management a breeze.

Need to know how many hours an employee has worked this week ? With the Shift Reporting tool, you have the ability to Export the Shifts to a PDF file for your records or for H.R. The PDF and the reporting tools let you view the Hours worked and any Future Hours each employee has.

Financials

From within the Job Management page you get a Quick glance Overview on Expenses, Staffing Costs, Income & Overall Profits for this individual Job. When your employees upload their expenses and invoices to the job, as you mark them as paid, they are automatically totalled up and displayed at the top of the job overview page. The same when the clients pay their invoice, this is added to the total and the final profit for the job is displayed. If your profit goes into negative, the total is colour coded red to alert management and administration that the job is running at a loss.

If you have setup individual Payment Rates from within the Employee Management section, you have the ability to add various Job Payment Rates for each band of employee for this job.

This allows you to advertise the job and the employee will only see the payment band they are on. e.g. if team leaders get paid alot more than standard employees, standard employees will never see how much team leaders receive and will only ever see their own payment rate. This prevents salary envy from within the workforce, as they never see what any other employee would receive apart from their own payment rate.

Job Status

The full job management process runs around the status of the Job. When you first add a job it is the pending state, the client has the ability to add information for the job and your employees have no access. When the job is switched to Active, the client no longer has editing controls but your Allocated Team have access to the Job. Once you switch the Job to Completed, both your employees and clients no longer have access to the job management. These automatic data access controls make managing your jobs easier as you no longer have to think about who has access to what data at what time. They have a data access window as the job progresses and the system automatically ensures the access window is closed when the data access is no longer needed. 

The Job status is also colour coordinated.

Yellow: Pending
Green: Active
Red: Completed
Grey: Cancelled

Once you change the Job status, it is then sorted into its corresponding page for easy access.

Audit trails

Job Audit Trails include all details for the job based on its destruction status, they include:

Always Available (Before and After data destruction):

  • Job Overview: Job name, client name, contact details and Audit generation date.
  • Expenses: List of Expenses added to the job including the total.
  • Impact Assessments: Breakdown of DPIAs and details listed.
  • Quotations: List of quotes that are tied to this job.
  • Staffing: DBS checks completed, pay rate, hours worked and the amount paid.
  • Employee Invoices: The invoice date, reference, amount the due date and if it has been paid.
  • Client Invoices: list of invoices filed to the client as part of the job.
  • Client Payments: any payments the client has made.
Before Destruction (Destroyed during data destruction): 
  • Subjects: list of individuals, vehicles and properties that have been added to the job.
  • Reports: the reports and final reports that have been added to the job.
  • Media: any media files and media attatched to reports, that have been uploaded for the client.
After Destruction (Created during data destruction):
  • Destruction Agreements: Any agreements for the client and employees, including their current signature status that have been generated as part of the Destruction stages.
  • Destruction Log: Stage 3 of the destruction process, generates a destruction log of all items destroyed. THis is logged in the Task Audit sheet after destruction also.

Job Notes

Add administrator Job Notes from within the Job Overview page. Nobody but the administrators and management can see these notes. They are normally used when large admin teams are working on your tasks. They can leave notes for each other to keep each other upto speed on the progress of actions or communication history on a job.

Briefing

Brief Sheets & Briefing notes to get and keep your team upto speed. 

The brief sheet (only available for Private Investigation and Survaillence) is upto industry standards and has sections used in Military surveillance planning, all sections are optional:

1.0 Introduction: a quick introduction  for your employees of what the job will entail.

2.0 Team List: Allows you to allocate your Successful team, who you piclk here will have access to the job information when it is switched active.

3.0 Subject Information: A list of all the Subjects comprising of Individuals, Vehicles and Properties, when the job is pending, the client has the ability to submit the subject information from their portal. Subject infomation breaks down into a Subject profile.

4.0 Ground: Map of the job location including all subject building locations pinpointed on the map.

5.0 Intelligence & Background: Any background and further intelligence you can provide to your employees.

6.0 Mission & Aims: Lets you list the Primary and Secondary objectives of the operation.

7.0 Execution: Lists steps of the execution including planning.

7.1 Preparatory Moves

7.2 RV Location & Time

7.3 Synchronize Equipment

7.4 Execution

7.5 Extraction

Briefing notes section allows you to add or update your own free hand briefing notes for the job.

The briefing notes section is available to jobs in all sectors across both the Security and Investigation industries. 

Subject Management

You have the ability to manage Subjects, while the job is in the Pending Status, the client also has the ability to add Subjects into the system.

The subjects are split up into three sub-types.

Individuals: used to add the identification of the person you are Protecting / Investigating.

Vehicles: used to add the make, model, colour and vehicle registration of a vehicle your employees  are working with. It could be a vehicle you are following, tracking or protecting.

Buildings: used to add the address of a property and location you are Protecting / Investigating. The system automatically generates its location on the map from the address details, and provides the corresponding location Longitude and Latitude for your records.

Subject Profiles

Subject profiles allow you to manage indepth who or what you are Investigating, Surveillancing, Tracking, Tracing or Protecting. When the job is in the “Pending” status, the client has the ability to add and manage the Subject profiles from their portal area. The profiles three sub-types contain.

Individuals: Phonetic Callout Code, Name, Age, Gender, Build, Clothes, Distinguishing Marks, Elevation, Face shape, Gait, Hair, Just Like, Gallery of uploaded Photos & Notes.

Vehicles: Phonetic Callout Code, Make, Model, Colour, Vehicle Registration Number Gallery of uploaded Photos & Notes.

Buildings: Phonetic Callout Code, Address, Town, Postcode, Country, Map, Gallery of uploaded Photos & Notes.

Site Instructions

A site instruction is a formal instruction typically issued by the head or lead contractor with instructions and directives to other contractors or subcontractors. The site instruction location allows you to add the site instructions that relates to the Job.

Standard Operating Procedures (SOP)

standard operating procedure (SOP) is a set of step-by-step instructions compiled by an organization to help workers or sub-contractors carry out complex routine operations. SOPs aim to achieve efficiency, quality output and uniformity of performance, while reducing miscommunication and failure to comply with industry regulations.

Impact Assessments

A Data Protection Impact Assessment (DPIA) is a process to help you identify and minimise the data protection risks of a project. You must complete a DPIA for processing that is likely to result in a high risk to individuals.

You can choose to complete the default DPIA form from the Information Commissioners Office or use our Impact Assessment Builder to build your own custom DPIA templates to reuse for specific jobs.

Operation Map

If your employees use the Mobile app for “Shift Logon” or “Manual Tracking”, the Employee Location information lets you get an overview of where you team exactly is at all times.

The red circle on the map is the Job operational area, combined with our Mobile and and GPS trackers, you can also configure Geo fencing for when a vehicle or employee leaves the operational or custom area of your choice.

Travel Information

The Travel Checklist allows you to create a checklist for your employees for when they are packing their case. There is nothing worse than arriving at the Airport to realise one of your employees has forgot to pack his passport and he ends up missing his flight. 

Minimise the risk with our Travel checklist that allows the Employee to tick off each item as they pack it into their case ensuring they have everything you require when they embark on the journey. 

When your Travel is booked you can add the Travel Booking Information to the Travel information section for your records. The Booking information section is viewable by all Active Team members, this allows for instance if your administrators are booking the flights, they can book flights, hotels and car hire and upload them to the software. The Employees can then login to the Employee portal or Mobile App, open the booking PDF and scan their flight barcode at the airport, display the booking information to the car hire company and hotelier. When the booking information is added, all the team are instantly notified.

Depending on the destination country, your Employees may need Travel Insurance, You can upload your travel insurance documents and each Employee can view their travel insurance documents at anytime from within their Portal.

Also depending on the destination country a Visa or Work Permit maybe required for your Employees, if you have applied and have them on record you may add these to the Employees portal under Travel Information. They can then retrieve it if they are approached by customs in the destination country.

Flight Reminders: You have the ability to add Flight reminders individually for all of your employees.

These flight details can be accessed at anytime during the job via the Employees Portal or Mobile App under Job >> Travel Information

The main reason you would add a Flight, is to remind your employees closer to the time of the flight. The software sends out an Email reminder automatically a day before they are required to attend the Flight.

We have meticulously pre-populated the software with 9,235 Airports including the corresponding Airport Code and World Area Code. This includes all Civilian and Military airports from around the world.

Why would we do this ? London has six major airports: London City, London Gatwick, London Heathrow, London Luton, London Stansted and London Southend and this is only one city. The worse thing that can happen is your employees turning up at the wrong city airport by accident.

Having the data pre-populated means you can search by airport name and code and match the code to ensure your employees know exactly which airport they should be attending.

Having the airport code as verification means that when the system sends out a Flight reminder, Assistants such as Google Assistant, Siri and Cortana can pick up the exact airport and follow on accurately with the reminder. 

The software sends out flight reminder emails a day before the employee is due to fly.

Reporting System

Manage reports Added from your Employees and with rapid one click add and edit tools that let you have your final report created and signed off to your Client in seconds.

You have the ability to add subjects to the reports, this allows you to create diffrent reports for different variations of subjects.

Report Lock: Once you activate the report lock, that prevents any of your teams on the ground from editing the report, the only users who can edit your report while it is in the locked state is your administration team.

Administrators have the ability to Manually add an event to the report, you can also attatch an image file that is associated with the event. When a Team member adds a report event from their portal or via the apps, the event is already pre-populated with their name and call sign.

 The Administrator has the ability to add report event items, for instance if your full team has compiled the report via the Mobile App, but one employee has provided their report events on paper, the management or administration teams can manually add the employees report events from the management section.

Media Section

The media section gives you an overview of all Images, Videos and Documents that have been uploaded to the Job, either by your ground team or administration team.

Images and Videos your Employees have uploaded or added to reports are automatically added to the media section. 

You can Sign-off any uploaded Media to your Clients at the single click of a button, this then alerts the Client that a media item is awaiting them in their portal area.

Employee Expenses

When an Employee uploads an invoice via their portal or via the Mobile App, the Expenses section allows you to keep expenses for your records or one click Sign-off to the client, if they have agreed to pay expenses.

Employee Invoices

When an Employee uses the Invoice Generator or uploads an Invoice from their Portal or App, they must choose a job to assign the invoice to. This allows you to keep Invoices in order and attatched to the relevant job.

Destruction Certificates

Because GDPR states that you should not keep data any longer than is necessary, we have developed and systematically tuned our process that ensures you are going above and beyond what is required to comply with data protection laws. We have broken the Data Destruction process down into 3 easy stages.

Stage 1 – Team: The first stage is to send out the Data Destruction agreements to your employees. Clicking the “Send Agreements” button will automatically generate an Agreement personal to each employee and send out an email asking them to login. Once they login to their portal they are forced to read and sign the Data Destruction agreement acknowledging that they have perrsonally Destroyed any data that relates to the Client and Job in question and if they have Not, that they are personally liable for any data breach if they have not destroyed the data as requested.

Stage 2 – Client: The second stage is to send out the Agreement to the client, clicking “Send Agreement” generates an agreement for the client and notifies them to login to their portal and review the agreement.  Once they login they are asked to back up their data and then sign the Data Destruction agreement. The Agreement is a client statement agreeing that they have: backed up all reports and media and have created relevant backups and they also agree to the destruction of their data.

Stage 3 – Destruction: Once stage one and two are completed and you are happy you have received back from your employees and clients, all the signed agreements. You can then “Confirm Signatures” once you have double confirmed the signatures, the button to Initiate the deletion becomes available. Once you click “Confirm” to initiate the Deletion, you are then asked to check and confirm that you understand. The Stage 3 process has four confirmations before data deletion to prevent accidental deletion.

  1. Confirm Signatures
  2. Review & Accept the Confirmation
  3. Initiate Deletion
  4. Confirm Deletion

Confirm Destruction: The confirm deletion page is then displayed advising you that the following items will be deleted from the system:

Brief Sheet
Briefing Notes
Reports
Report Media
Subjects
Subject Media
Documents
Standard Operating Procedures
Shift Notes
Travel Information
Mapping Information
Tracking Information


Upon clicking confirm the data is destroyed and files overwritten repeatedly. 
The data is then wiped to MoD Approved CESG Baseline standards to Infosec Standard No 5. Basically all personally identifiable information is instantly destroyed, only the Financial records, Impact Assessment and all other data required to comply with both the “Money Laundering Regulations Act 2019” and “Data Protection Act 2018” is retained. A Data destruction log is produced by the system showing exactly what was deleted. For instance the deletion log states “Subject Photo Destroyed” advising that there was a Subject Photo and it has been destroyed but you can not retrieve the actual photo data anymore.

Send / Review Certificate: Automatically a Destruction Certificate has been generated from the system, you have the ability to view and download the certificate or click “Send Certificate” to Instantly send an email to the client with the Certificate Attatched as a PDF File.

Certificate PDF Email Attatchment: Destruction Certificate in PDF format is Automatically generated by the system, your company branding is automatically added. 

The Clients Name, Company name is added to the presented to field, the date and the Job reference is automatically added also. The certificate body text can be changed from within the data destruction certificate settings page.

Job Contracts

If you have signed any external contracts or contracts with third party companies that pertain to this specific job, you can upload the contract and the effective date to the job contract document storage page.

Job Quotations

The initial quotation that is accepted by the client is tied to the job, you then have the ability to quote for extra items as part of the same job. For example if a client wanted a price to extend the job by a specific time or add an aditional service to the same job. You could send the quote to the client, keeping the paper trail tied into the same job, keeping your records and job history clean and tidy.

Job Client Invoices

Any invoice you add to the job is stored inside the individual job page, keeping a clean and tidy paper trail. This lets you also keep individual job finances for the amount you have invoiced for and if the invoices have been paid and the total profits.

Miscellaneous Documents

Miscellaneous Documents allow you to add documents that dont fit into any other section in the system. You can make the documents available to Employees, Clients, Both or Admin only.

Basically you can file to this job, any document in Microsoft Word, PDF, Microsoft Excel or Image format.

The Ultimate Management software for the Security & Investigation Industries.